Musical Instruments // PCOMP W3

Sep 22, 2024

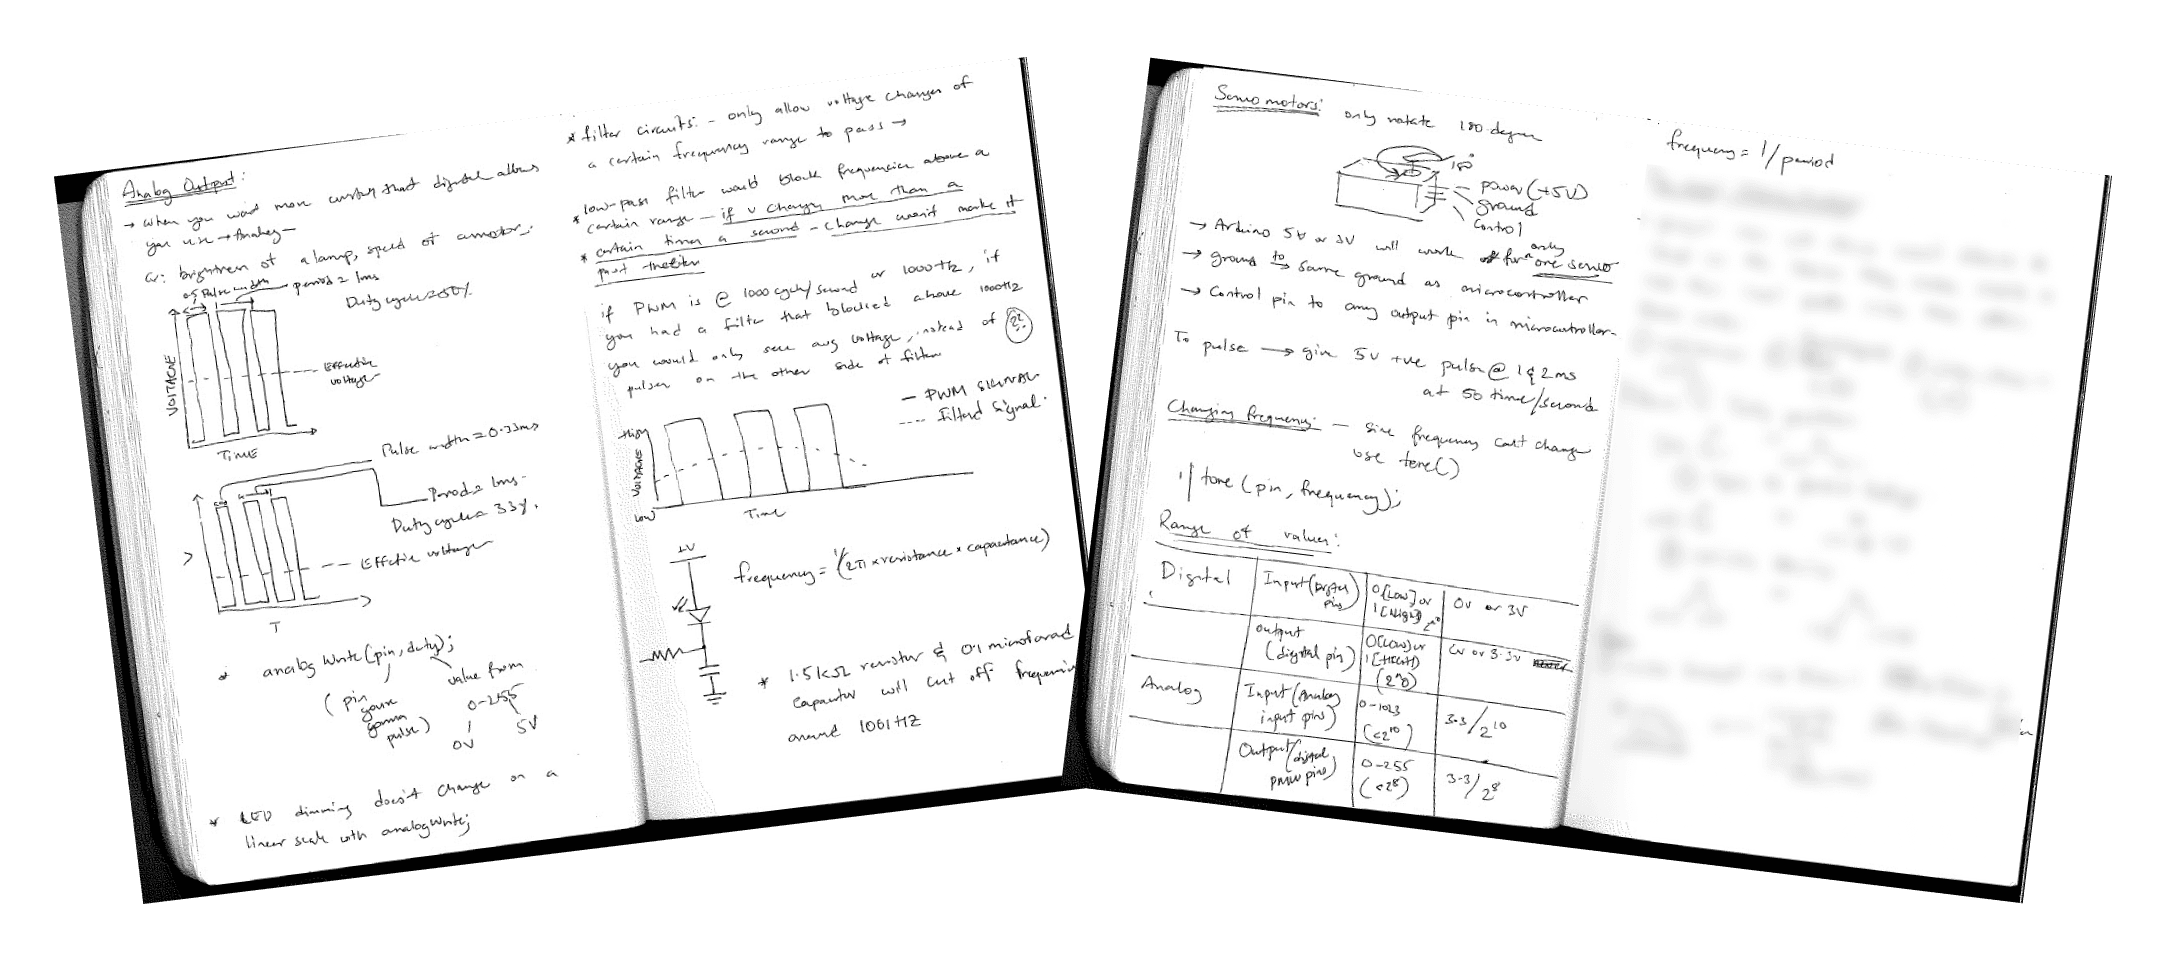
But first, some theory: Analog Output in Microcontrollers

This week's PCMOP work was light and went by like a breeze. I started by reading through the theory and taking notes on analog output in microcontrollers. Here's what I learned :

  1. Pulse Width Modulation (PWM) is the key to "faking" analog output on digital pins.

  2. PWM applications include LED dimming and DC motor speed control.

  3. The analogWrite() function controls PWM on specific Arduino pins.

  4. Servomotors can be precisely controlled using PWM signals.

  5. The tone() function generates different frequencies for audio output.

  6. Understanding the value ranges for digital and analog input/output is essential for effective microcontroller programming.

While the work was light, these concepts were very helpful in understanding the labs and help set a concrete foundation.

Lab 1 : Tone Output

This week in our labs, we delved into sound generation using Arduino. Here's a breakdown of my experience through the lab exercises:
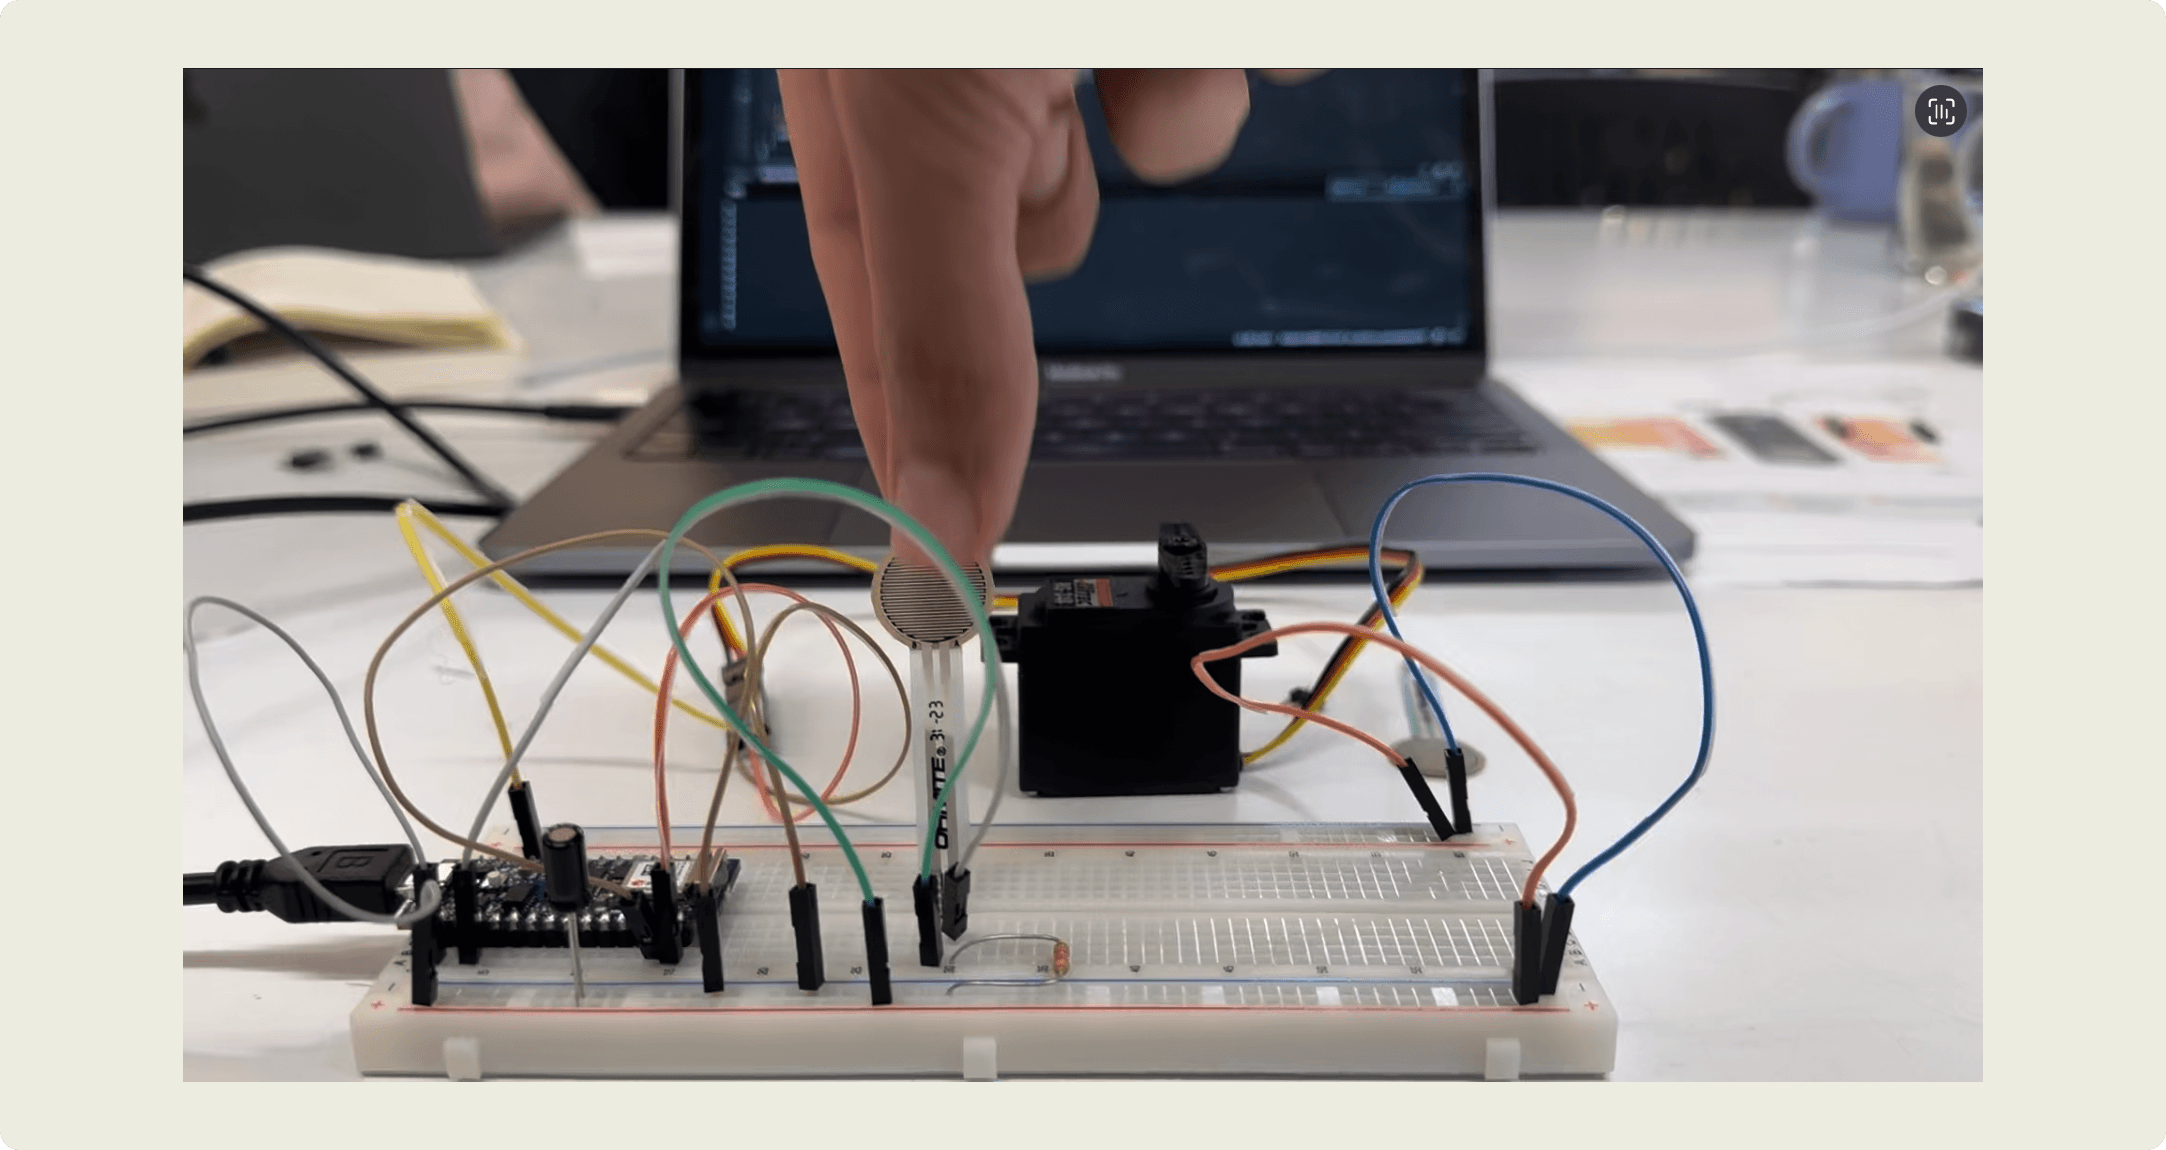
Sensor input range

I started by wiring up my Arduino with a force-sensing resistor. Using a simple sketch to read the analog input, I watched the serial monitor as the values changed with my touch. Below is code and video of the readings.

void setup() {
  Serial.begin(9600);       // initialize serial communications
}
 
void loop() {
  int analogValue = analogRead(A0); // read the analog input
  Serial.println(analogValue);      // print it
}
Speaker Test

Next, I connected a small speaker to my Arduino. Using the tone() function, I programmed it to play a constant 440Hz tone - Hearing that first beep was pretty cool, translating code to sound.

void setup() {
  // nothing to do here
}
 
void loop() {
  // play the tone for 1 second:
  tone(8, 440,1000);
  // do nothing else for the one second you're playing:
  delay(10000);
}
Play Tones

I mapped the sensor input to a frequency range of 100Hz to 1000Hz. It had created a simple instrument! Moving my hand by pressing the sensor produced a range of tones, and I spent some time just playing around with it.

void setup() {
  // nothing to do here
}
 
void loop() {
  // get a sensor reading:
  int sensorReading = analogRead(A0);
  // map the results from the sensor reading's range
  // to the desired pitch range:
  float frequency = map(sensorReading, 0, 1000, 100, 1000);
  // change the pitch, play for 10 ms:
  tone(8, frequency, 10);
  delay(10);
}
Play it Loud

To amplify the sound, I modified the circuit by adding a transistor. This little addition made a big difference in the volume output.

A More Complex Example

Using the pitches.h file, I programmed an array of notes and durations. This made the arduino sent output to the speak to play a tone.


#include "pitches.h"

// notes in the melody:
int melody[] = {
  NOTE_C4, NOTE_G3, NOTE_G3, NOTE_A3, NOTE_G3, 0, NOTE_B3, NOTE_C4
};

// note durations: 4 = quarter note, 8 = eighth note, etc.:
int noteDurations[] = {
  4, 8, 8, 4, 4, 4, 4, 4
};

void setup() {
  // iterate over the notes of the melody:
  for (int thisNote = 0; thisNote < 8; thisNote++) {

    // to calculate the note duration, take one second divided by the note type.
    //e.g. quarter note = 1000 / 4, eighth note = 1000/8, etc.
    int noteDuration = 1000 / noteDurations[thisNote];
    tone(8, melody[thisNote], noteDuration);

    // to distinguish the notes, set a minimum time between them.
    // the note's duration + 30% seems to work well:
    int pauseBetweenNotes = noteDuration * 1.30;
    delay(pauseBetweenNotes);
    // stop the tone playing:
    noTone(8);
  }
}

void loop() {
  // no need to repeat the melody.
}

A Musical Instrument

The final part of the lab was to create a simple musical instrument. I followed the instructions to connect three force-sensing resistors to my Arduino, each corresponding to a different note. The code programmed the Arduino to play a specific note when each sensor was pressed.

The result was a basic three-key keyboard!

#include "pitches.h"
 
const int threshold = 10;      // minimum reading of the sensors that generates a note
const int speakerPin = 8;      // pin number for the speaker
const int noteDuration = 20;   // play notes for 20 ms
 
// notes to play, corresponding to the 3 sensors:
int notes[] = {NOTE_A4, NOTE_B4, NOTE_C3};
int sensorPins[] = {A0, A1, A2};  // Ensure sensors are connected to analog pins
 
void setup() {
  // No setup needed in this simple example
}
 
void loop() {
  for (int thisSensor = 0; thisSensor < 3; thisSensor++) {
    // get a sensor reading:
    int sensorReading = analogRead(sensorPins[thisSensor]);
 
    // if the sensor is pressed hard enough:
    if (sensorReading > threshold) {
      // play the note corresponding to this sensor:
      tone(speakerPin, notes[thisSensor], noteDuration);
      delay(noteDuration + 20);  // Add delay to allow the tone to be heard
    }
  }
}

Lab 2 : Servo Motor Control Using an Arduino

This lab was also pretty straightforward, here's a brief overview of my experience:

Circuit Setup: Wired an analog sensor (FSR) and a servo motor to the Arduino. T

  • Programming:

    • Read analog input from the sensor

    • Mapped sensor values (0-1023) to servo angles (0-179)

    • Used Servo library to control motor position

  • Fine-tuning: Learned to update servo every 20ms for smoother motion.

#include "Servo.h"      // include the servo library
 
Servo servoMotor;       // creates an instance of the servo object to control a servo
int servoPin = 9;       // Control pin for servo motor
// time when the servo was last updated, in ms
long lastMoveTime = 0;  
 
void setup() {
  Serial.begin(9600);       // initialize serial communications
  servoMotor.attach(servoPin);  // attaches the servo on pin 9 to the servo object
} 
 
void loop() {
  int analogValue = analogRead(A0); // read the analog input
  Serial.println(analogValue);      // print it
 
  // if your sensor's range is less than 0 to 1023, you'll need to, max reading was 400 so i adjusted them
  // modify the map() function to use the values you discovered:- changed it from 0-150 to 0-255
  int servoAngle = map(analogValue, 0, 400, 0, 255);
 
  // move the servo using the angle from the sensor every 20 ms:
  if (millis() - lastMoveTime > 20) {
    servoMotor.write(servoAngle);
    lastMoveTime = millis();
  }
}

©2019-2025 SURYA NARREDDI.

©2019-2025 SURYA NARREDDI.